It is practically impossible to teach good programming style to students that have had prior exposure to BASIC; as potential programmers they are mentally mutilated beyond hope of regeneration.
-- Edsger Dijkstra
Introduction
This little article will explain how to setup an environment for developing python programs. It will explain the different components and the workflow for developing slightly larger programs in python since the small tutorial ones are pretty much covered and they always (in my opinion) leaves out the really hard stuff. This article will not try to convince you to start writing in python, I'm assuming that you already are curious about python or simply isn't satisfied with your current setup. Before you begin, you should make sure that you have python and some kind of make system. Check out the Resources section for links.
The editor
Every new language seems to come with a slick new IDE that you need to learn and at first glance so does python and it doesn't. If you're really into a slick integration you are probably better off with C# and the new Visual Studio .NET, which really looks really really slick and sweet. But if you're more concerned with getting the software to run and ship, you might be more inclined to don't bother with these small things and get right to the code.
Surprisingly, the very best environment I've tried is the not Visual Python or WingIDE that handles all the debugging and other nifty stuff, rather it's SciTE. It's a surprisingly good text editor that is portable over several platforms. It's just that, a text editor so it doesn't contain a debugger for python, nor a build system. I'll address these issues later on. The important thing is that the turnaround time for developing a script is reduced by some very simple features of this editor. The one feature I like about the editor is the automatic completion of words you've already written. Since python is dynamically typed there is no way an editor could figure out what the object you are accessing have as members. But chances are that you've already written this previously in the file, so it just does a simple text search in the file.
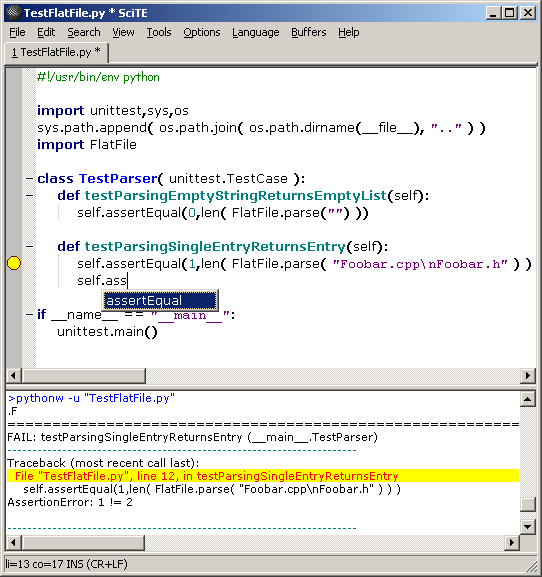
Fig1 shows that we can invoke a build on our little unit test file with a simple keypress (F5) and then cycle through our errors with F4. Simple enough. Another very important feature is CTRl-1, which invokes the python compiler to check for syntax errors. Remember that this is not as useful for a dynamic language as python as it is for a static typed language like C++ since the compiler can't really check for anything else than gross errors. For example just typing some random garbage like ahhhrg will still compile since that could be a valid variable and any identifier is a valid expression by itself.
SciTE is surprisingly configurable and capable. Looking at the installation directory we see a file called python.properties. Looking at this file there are a couple of interesting items. A fun fact is that the properties files in SciTE are straight lua files, so the syntax is really suited for initialization. You might already have realized that there is a tool for compiling the python code at CTRL-1. Adding new tools is really simple, add the following to the python.properties files for binding CTRL-2 to running tabnanny:
command.name.2.*.py=TabNanny
command.2.*.py=python -c "import tabnanny; tabnanny.check( r'$(FilePath)')"
Writing unit tests
Unit tests really shines when it comes to dynamically typed languages like python. Since the bulk of the errors have shifted from compile time to runtime, code coverage in the unit tests become really important. Writing unit tests is really easy with the standard module unittest that comes with the python dist. A very simple test for a player module would maybe look something like this:
import unittest
import game

class TestPlayer( unittest.TestCase ):
    def setUp(self):
        self.player = game.player()

    def testDefaultPlayerHasZeroScore(self):
        self.assertEqual(0,self.player.score)

    def testPlayerGainsScoreOnPowerup(self):
        self.player.onPowerup( "gun" )
        self.assert_(self.player.score > 0)

if __name__ == '__main__':
    unittest.main()
I've separated the tests and the source files in a project, the tests and their makefile lives in a child directory named "Tests". This directory also holds helper classes for the tests, e.g. like mockers.
Running tests
So you have all these wonderful tests and now we want to run them before checking everything into our repository (hey, you're using some kind of source control, right?). For this purpose our old friend make is coming to the rescue. I'm using gnu make, which you should be able to find a port for your system. If you happen to sit on a unix-ish system chances are that you already have it. If your on a win32 box, go the resources section and download UnxUtils, which contains a decent port of gnumake.
Once you've verified that you have an installed version of gnu make, create a makefile looking like the one below for your project and change the variable TESTSUITES to reflect your own project.
PYTHON = python -u
RM     = rm -f

TESTSUITES = TestProduct.py \
             TestNode.py \
             TestFlatFile.py \
             TestPath.py

.PHONY: all clean check

all: check $(subst .py,.tst,$(TESTSUITES))

clean:
	@$(RM) *.pyc ../*.pyc

check:
	@echo Running tabnanny...
	@$(PYTHON) -c "import tabnanny; tabnanny.check( '..' )"

%.tst: %.py
	@echo $<
	@$(PYTHON) $<
The output of the tests might look something like this:
C:\aurora\Tools\BuildSystem\FinalConfig\Tests>make
TestProduct.py
Ran 0 tests in 0.000s

TestNode.py
Ran 1 test in 0.000s

TestFlatFile.py
Ran 2 tests in 0.000s
There are several interesting points in the two previous listings. You might have noticed that I have a clean rule in the makefile. The reason is to make sure that stale .pyc files are removed from the system. If you're developing python scripts you'll sooner or later be bitten by stale .pyc files. The syndrome is really obvious when no matter what changes you make to your module, nothing in the tests change. The bad news is that you can't simply inspect the timestamps of the .py and .pyc files (find out why here). The good news is that compilation isn't really that much of a deal so simply removing the files is just fine.
Another observation we can make is that the rule check is doing something funny. It is invoking the python interpreter with an inline script that runs a module tabnanny. Tabnanny is a standard module in later python versions that can provide you with indentation information.
A full development cycle would look like this:
- Get latest from the repository
- Start making modifications to module of interests
- Run that single module's unit tests
- When module is complete, run the whole program's unit tests through the makefile
- Commit changes to repository
Debugging
Debugging is something that always will be there, but as you become more familiar with the language you will need it less and less. It is however a very valuable tool for learning the language and explore the standard libraries, so we will cover it briefly here.
The standard IDE, Idle, that comes with every python dist is a fair debugger, it is kind of the reference implementation. You can step through and inspect variables. Nothing fancy, but fully adequate.

If you want to embed python in your own application, you probably want to write a remote debugging stub yourself and then have an IDE connect to that session (hint games). For this purpose you could use the HAP Python Remote Debugger which supports remote debugging and it's also relatively easy to implement you own stub on the client side, i.e. your game. The IDE is very Visual Studio 6-like, the keyboard shortcuts are virtually the same1.
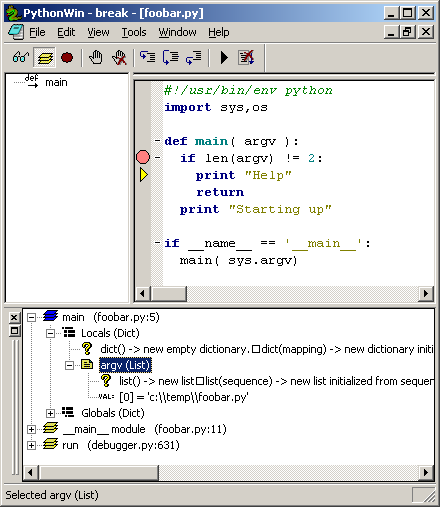
If you're developing on windows, be sure to get ActiveState's ActivePython a try, as it comes bundled with PythonWin which is a decent IDE for developing python scripts in. The debugger is also fairly capable, but alas no remote debugging. It is pretty good though, and probably should be the first stop to at least measure all the other ide's against.
In closing
So, now your ready to take the step into python development with a notion of how you might solve the problems when they come your way. Armed with make, unittest and scite you should be able to develop larger applications than just a couple of quick lines. Of course, this is really just an appetizer, for more reading look at these sites:
- Official python documentation. Really, read it. More than once. There are so much in here and it should be your first stop for information.
- Dive into python. A good tutorial on python for programmers. Stands out as it has a section on unit testing.
- Python Cookbook. A searchable database of small code snippets that solves specific problems in Python. Great for finding out how to solve that obscure problem in this new strange language.
- Python for beginners. Even more links to tutorials and information.
Resources
- UnxUtils. Native ports of various unix utilities to Win32. A must have for any serious developer. It has gnu make ported without evil cygwin! And of course sed and awk...
- ActiveState Python. A good dist of python which in addition to the standard stuff includes win32 bindings and the PythonWin IDE.
Footnotes:
1 Which was good when I started to use it because I was using Visual Studio 6 at the time,
but now I've become spoiled with the 2003 version and soon I guess I'll make that painful transition to
Visual Studio .NET 2005.